Understanding Dew Drop Formation
Dew is formed through a process called condensation, which occurs when moist air comes into contact with a cooler surface, causing the moisture in the air to turn into liquid. Typically, dew forms overnight when temperatures drop and objects, such as grass blades, become cooler than the surrounding air. This temperature difference leads to the accumulation of tiny water droplets. A combination of atmospheric conditions, such as high humidity and clear skies, encourages dew formation. Understanding these conditions allows photographers to anticipate when and where dew might form, providing an opportunity to capture these ephemeral droplets in their morning splendor. By comprehending the delicate balance of temperature and humidity required for dew formation, photographers can enhance their chances of photographing these intricate natural jewels.
Essential Equipment for Dew Photography
Capturing the delicate beauty of dew drops requires some basic equipment to ensure high-quality images. A DSLR or mirrorless camera with a macro lens is a must, as it allows for close-up shots with sharp detail. A tripod is essential to stabilize the camera for longer exposures, especially in low-light conditions. Additionally, a remote shutter release or a camera with a self-timer function will help prevent camera shake. Lens hoods can be helpful to reduce lens flare and protect the lens from stray light, while extension tubes can provide greater magnification. Bringing along a cloth to wipe the lens and a kneeling pad or mat for comfort can also enhance the photography experience. Investing in quality equipment can make a significant difference in capturing the intricate details of dew drops.
Best Times of Day to Capture Dew Drops
The best time to photograph dew drops is during the early morning hours, shortly after sunrise. This is when temperatures are low and humidity is high, creating the perfect environment for dew to form. The soft, diffused sunlight during this time provides balanced lighting, enhancing the natural sparkle of the dew without harsh shadows. Additionally, the golden hour, which occurs shortly after sunrise, offers warm and pleasing light that enhances the colors and textures of the scene. Late evenings can also present opportunities for capturing dew drops, as cooling temperatures can lead to dew formation. However, morning is preferred due to the freshness of the dew and the appealing quality of morning light. Planning around these times ensures opportunities for capturing captivating dew shots.
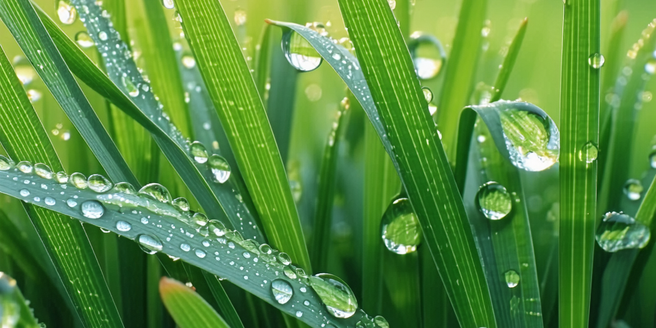
Creative Composition Techniques for Dew Shots
Creative composition is key in dew drop photography, transforming ordinary scenes into captivating images. Begin by experimenting with angles and perspectives; getting low to the ground can highlight the drop’s reflection and enhance its transparency. Incorporate complementary elements such as flowers or leaves to create an interesting frame or backdrop. Utilize the rule of thirds to place dew drops strategically within the frame, guiding the viewer’s eye through the image. Seek out dew-laden spider webs or other surfaces that amplify the visual interest through geometric patterns. Play with depth of field by adjusting the aperture settings to blur the background and highlight the dew drop, creating a sense of depth. By combining these techniques, photographers can create vivid and memorable compositions.
Lighting Tips for Enhancing Dew Drops
Lighting plays a crucial role in dew drop photography, as it affects the transparency, sparkle, and overall mood of the image. Natural light is often preferred, especially during the golden hours when the sun is low, casting warm, soft light. Side lighting can add depth and dimension, highlighting the contours of the dew drops. Backlighting is particularly effective in making dew drops appear to glow and emphasizes their spherical shapes. Reflectors can be used to bounce light back onto the dew drops, illuminating them without the need for artificial sources. For those who prefer to use flash, diffusers can soften the light and reduce harsh reflections. Understanding and manipulating natural and artificial light sources can elevate the appearance of dew drops in photographs.
Post-Processing Tips for Dew Drop Images
Post-processing is the final touch to enhance dew drop images, bringing out details and balancing exposure. Start by adjusting the white balance to ensure that colors appear natural and accurately represent the scene. Enhance the contrast to give depth and dimension, emphasizing the shape of the dew drops. Increasing sharpness can highlight the edges of the drops and add clarity, while noise reduction helps maintain smooth textures. Consider using selective adjustments to brighten key areas or darken backgrounds, drawing attention to the main subject. Color saturation can be moderated to avoid an unnatural look, focusing instead on the dew drops’ natural tones. Through careful post-processing, photographers can refine their images, ensuring that the beauty of dew drops is showcased to its fullest potential.