Choosing the Right Gear for Weather Photography
Selecting the right gear is crucial for capturing stunning weather photographs. Start with a robust camera body that can withstand various weather conditions. A good choice might be a DSLR or mirrorless camera with weather sealing. Lenses are equally important; a wide-angle lens can capture expansive cloudscapes, while a telephoto lens is ideal for capturing distant storms. Don’t forget a sturdy tripod to stabilize your camera in windy conditions. Additionally, consider investing in a weatherproof camera bag to protect your equipment from moisture and dust. Filters, such as polarizers and neutral density, can enhance your photos by managing glare and improving color saturation. Finally, always check weather forecasts and prepare your gear accordingly to ensure you’re ready for any situation that arises during your shoot.
Understanding Weather Patterns and Lighting
Grasping the dynamics of weather patterns and lighting is vital for successful weather photography. Begin by studying meteorological forecasts to predict conditions conducive to dramatic shots. An understanding of cloud formations and storm systems will help you position yourself for the best captures. Lighting is equally pivotal; golden hours around sunrise and sunset offer soft, flattering light perfect for striking landscapes. Conversely, harsh midday sun can create challenging contrasts but also opportunities for dramatic cloud or storm photography. Additionally, consider the direction and quality of light, as it influences mood and texture. Learn to interpret weather maps and satellite images to anticipate shifts in weather that may lead to unique photographic opportunities. This knowledge equips you to make informed decisions, enhancing your ability to capture the ever-changing beauty of weather phenomena.
Techniques for Capturing Dramatic Skies
To capture dramatic skies, start by focusing on composition. Use leading lines or natural frames to guide the viewer’s eye towards the sky. Experiment with different perspectives to find unique angles that highlight the sky’s grandeur. Timing is key; the fleeting nature of dramatic skies demands a readiness to shoot quickly. Adjust your camera settings to emphasize the sky’s colors and contrasts—using a small aperture (high f-stop number) can help maintain sharpness throughout the scene. Experiment with shutter speed; a slower speed may create a sense of motion in clouds, while a fast shutter can freeze decisive moments. Utilize filters, such as polarizers, to enhance textures and saturation. Post-processing can further enhance details, but aim to keep your images natural. Mastering these techniques will elevate your ability to capture breathtaking sky scenes.
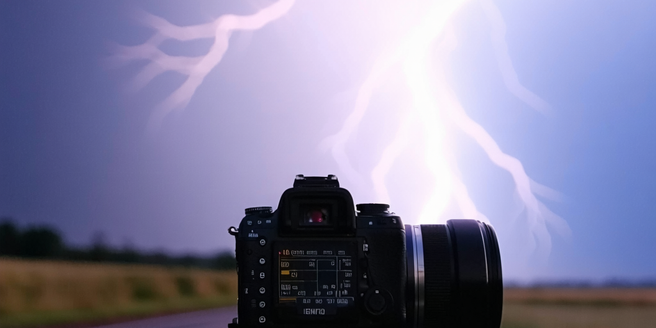
Safety Tips for Shooting in Extreme Conditions
When capturing images in extreme weather, safety should always be your top priority. Start by checking weather forecasts and be aware of any warnings or danger zones. Dress appropriately in layers and waterproof gear to protect yourself from the elements. It’s essential to have a basic emergency kit that includes a first aid kit, water, and non-perishable snacks. Communication is key; inform someone of your location and expected return time. Always keep a safe distance from hazardous weather phenomena such as lightning, floods, or high winds. Use a sturdy tripod and anchor your equipment securely to prevent damage. Familiarize yourself with the signs of hypothermia or heat exhaustion, and take breaks to rest and refuel. By prioritizing safety, you can focus on capturing breathtaking images without compromising your well-being.
Post-Processing Tips for Enhancing Weather Photos
Post-processing is an essential step in refining your weather photography. Start by importing your photos into a reliable editing software and evenly adjusting exposure, contrast, and color balance to bring out the best features of your image. Use the crop tool to refine composition and eliminate distractions. Pay attention to shadows and highlights, ensuring that details are suitably enhanced without overexposing or underexposing areas. Sharpness should be adjusted carefully to highlight textures without amplifying noise. Consider using the dehaze tool to improve clarity and reveal hidden details. Dodging and burning can add depth and direct the viewer’s eye. Always aim for a natural look, maintaining the scene’s authenticity while enhancing its intrinsic elements. By following these steps, your weather photos can achieve a polished and impactful final presentation.